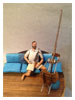
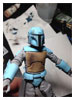
Over the past couple of weeks, we've been showing you pictures of some of the amazing work that Rebelscum forum member Sward21cs, aka Stephen Ward, has been doing, customizing a number of Boba Fett figures from Hasbro's The Black Series 6-Inch line, and we know for a fact that many of you have been digging it. Well now, Stephen has been kind enough to put together a brief article on how he makes his own customs!
My name's Stephen Ward, I'm from Austin, Texas, and on a whim last year I decided to rework one of the new Black Series Boba Fett figures. Hasbro did a great job with the figure but the paint apps were...lacking a little bit. I'm kinda particular about details and was fortunate enough to get two figures around the holidays; one I kept mint in the box and the other became fodder for a 'movie accurate' version based on
The Empire Strikes Back. Using many high-resolution photos of Boba's helmet (taken when the 'hero' helmet & costume has been publicly displayed on various tours in recent years), as well as screen grabs from the film, I set out to replicate even the smallest scratches, dings, and chips of the helmet. It turned into a project of replacing the rangefinder, the Wookiee scalps, repainting the flight suit and the boots, weathering the armor more, and adding some details to the rocket pack. All in all, it became a big project which took on a life of its own...but I am very satisfied with the time I spent to make it accurate to
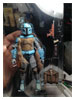
Empire, and proud that I sunk the time into the project. This only whet my appetite to do more versions of Boba. Thanks to friends who wanted custom work done, I've been lucky enough to do different versions of him including this one- the Holiday Special version.
The whole world of
Star Wars customs is new to me, despite sculpting and painting being second nature-I sculpt & paint a lot of historical miniatures in 1:32nd scale like the Hemingway piece or the 'Death Dance' based on one of the woodcuts of Hans Holbein the Younger. The same principles of painting apply to a 6 figure which apply to a 1:32nd scale figure, just bigger. This article should serve as a primer for some of the basic techniques, tools, and supplies needed to make your own
Star Wars custom figures, whether from this series or in the 3 ¾ range.
 PREPPING THE FIGURE
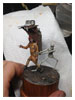
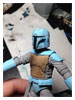
The first thing to do for this version was compare it to the reference images from the 1978 Holiday Special (referred to from now on as HS). Some things needed to be done to the figure before I could paint it. First I had to go about removing the Wookiee scalps with a fresh Xacto blade, then removing the stock cape, and finally carving off the molded-on rangefinder and sanding the area where it was smooth using steel wool and a synthetic polishing pad. Once this was done, work could proceed on some changes to the armor.

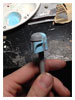
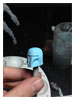 MODIFYING
 The biggest glaring discrepancy was the chest plate armor- the
Empire version on the figure is different from the HS version. Using a sculpting putty called Magic Sculpt (air drying, workable with only water, waxy consistency) I filled in the seams of the top parts of the chest plate, using my homemade brass rod sculpting tools to smooth it out and help blend the transitions between putty and the original figure. Once it was dried under a lamp with a 60w bulb, it was rock hard and ready for sanding. Using incrementally finer grains of sandpaper, followed by steel wool and finally a polishing pad I made the new armor and the original surface look seamless. Now that the chest armor was complete, the painting can begin.
 PAINTING
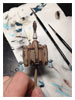
Before paint always comes primer. I use Brite Touch gray automotive primer, which goes on lightly but dries extremely smooth. It takes a few coats to get complete coverage of the parts, but I won't use any other primer since I can't find one with better results.
After letting the primer dry overnight, painting begins using Vallejo and Reaper brand acrylic paints. Acrylics are great because not only are they water soluble, but fairly durable as well. I started using Vallejo paints over fifteen years ago for my miniatures, and discovered Reapers a few years ago. They are each mixable with one another, another benefit of acrylic paints.
The actual painting of the figure could take up an article all it's own, but after base coats of the main colors were applied using thinned paint and Kolinsky sable brushes, all the scratches, dings, scrapes, and chips on the armor were applied using a 000 size miniature brush. Many layers of paint had to be applied in order to get all the realistic chipping and weathering effects, not only on the figure but very heavily on the rocket pack.
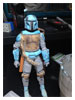
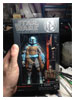
FINISHING TOUCHESAfter the painting was complete, unraveled jute twine was used to make new Wookiee braids, and the brown cape was made from a piece of an old Army brown t-shirt of mine. The new rangefinder, made by attaching the top portion of the original piece to a new piece of brass strip, was affixed using two-party epoxy glue. Once everything was complete, he was put back into the plastic backer and slid back into the box to ship out to my friend Shane. Another custom down...
I wanted to say thanks- namely to my good friend Frank Laureyssens for kick starting this article's existence. as well as my good buddies Shane Kelly and Jawad Dar for your support of the art behind these custom figures. Without y'all, I might have stopped at just one figure in my own cabinet. And a big thank you goes to Adam here at Rebelscum.com for the opportunity to start sharing my work and its process here.